Yealink
Yealink are a great budget alternative to Polycom. They are very similar in functionality, but in our opinion the sound quality is not quite as good. We have a lot of happy users who say great things about them though.
Supported Features
All models are capable of getting power from the network (802.3af). This means your desk with be very un-cluttered. No worrying about power supply wires all over the place.
New phones are now supported on our Zero Touch platform, so if you purchase a new Yealink you can just enter the serial number into our console and the phone will just work. If it is an older phone or doesn't work on Zero touch then you can use our provisioning system - it just requires a few settings to be entered.
Phones tested

We have tested T20, T22 and T26. All phones in this range should work. We tested the phones with firmware 9.6.23.6 and hardware version 7.0.0.60.
We have also tested the DECT phone W52P.
Multi handset
On the W52P you need to use multiple handsets you need to provision multiple accounts in the babblevoice console. This can be done via the Multi tab whilst editing the device. Selecting other devices will allow the provisioning system to configure multiple handsets.
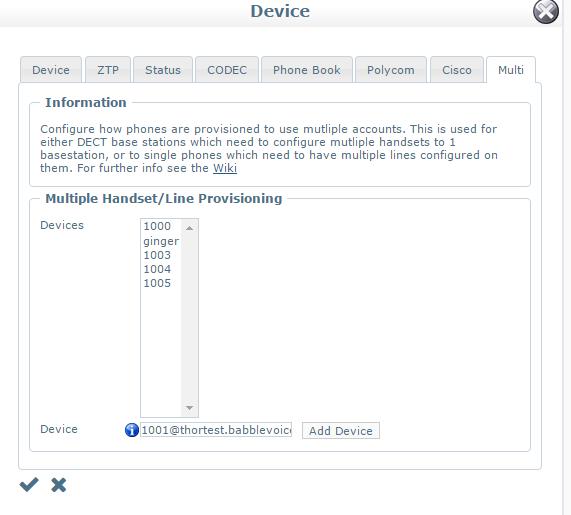
In the list of other devices select any you want to provision as second, third, forth or fifth handsets to a base station, then from the auto-provision options on the phone enter the details for the main device and the other devices will also provision to any other handsets you have.
Accessing Web Gui
The easiest way we found to auto-provision a Yealink was from the web-GUI, although it is possible from the phone, through the advanced settings.
Obtaining IP Address
To find the IP Address for the phone, first press the "OK" or "MENU" key to access the phones menu. From here scroll through until you reach "Status", if the first entry is not "IP:-"' then simply scroll downwards until you find it.
Accessing The Web GUI
To gain access to the phones web GUI. First follow the step above. Then enter the IP Address into the URL field in web browser, from here it will request a username and password. If this has not been changed by the user, the default is "admin" in both sections, now you can see the GUI for the phone and carry along with the rest of the guide
Auto-Provision
Auto provision is used if Zero touch is not available or not working for the phone. It is a way of pointing the phone to our provisioning servers without the first step of zero touch. A little more config is required on the phone.
Step 1
First access the web GUI like this then you should see a screen like this:
Unless you are using a W52P where this menu will be under phone-> auto provision.
Step 2
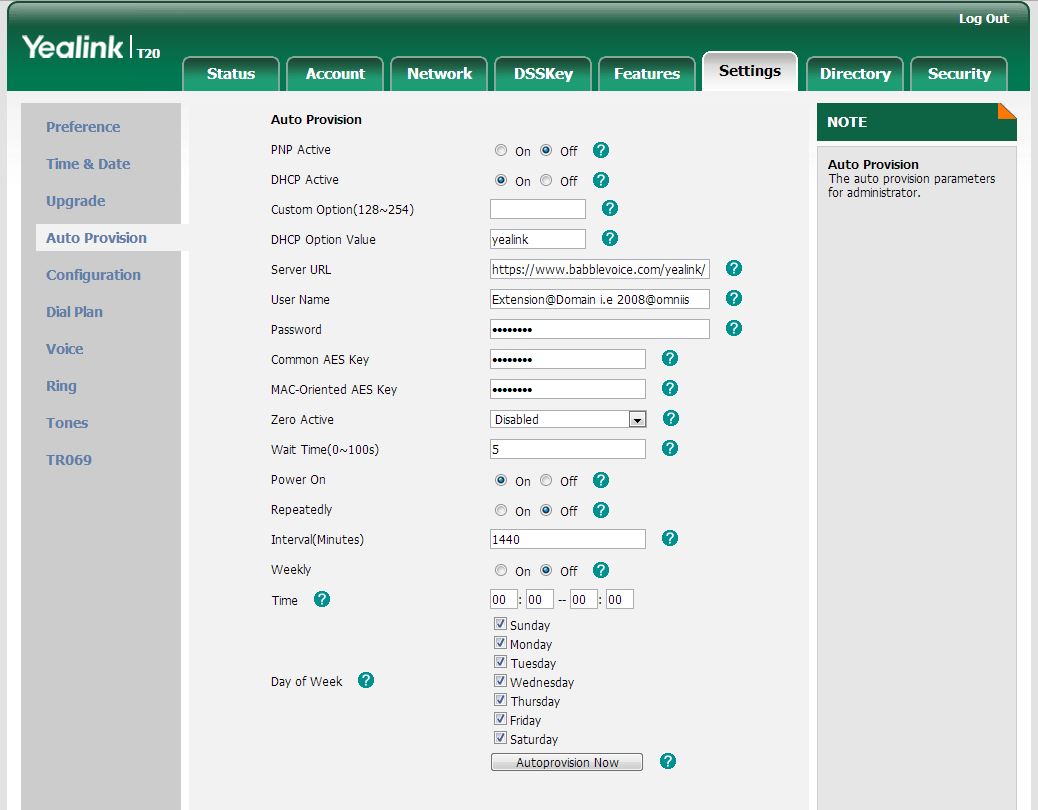
Next you will want to navigate to the page shown above by selecting Settings from the toolbar at the top then Auto-Provision from the options in the side bar.
Step 3
- Now you will see that screen, so then you should enter the Server URL exactly as shown above, "https://www.babblevoice.com/yealink/"
- User Name this is for the device being configured, in the format extension@domainname, for provisioning extension 2008 for the domain omniis.babblevoice.com you would input 2008@omniis
Please note that on W52P's this field will need to be in the format extension_domainname Password This is the device password from the babblevoice console, which can be configured.
Finally you will click the button at the bottom which says 'Autoprovision Now'.
Then the phone will begin the auto-provisioning process. Once complete you will be set up for babblevoice.
W52P Specifics
Auto-provision Credentials
On the Yealink W52P's you will see a menu like the below by accessing the phone tab across the top and the auto-provision menu on the left.
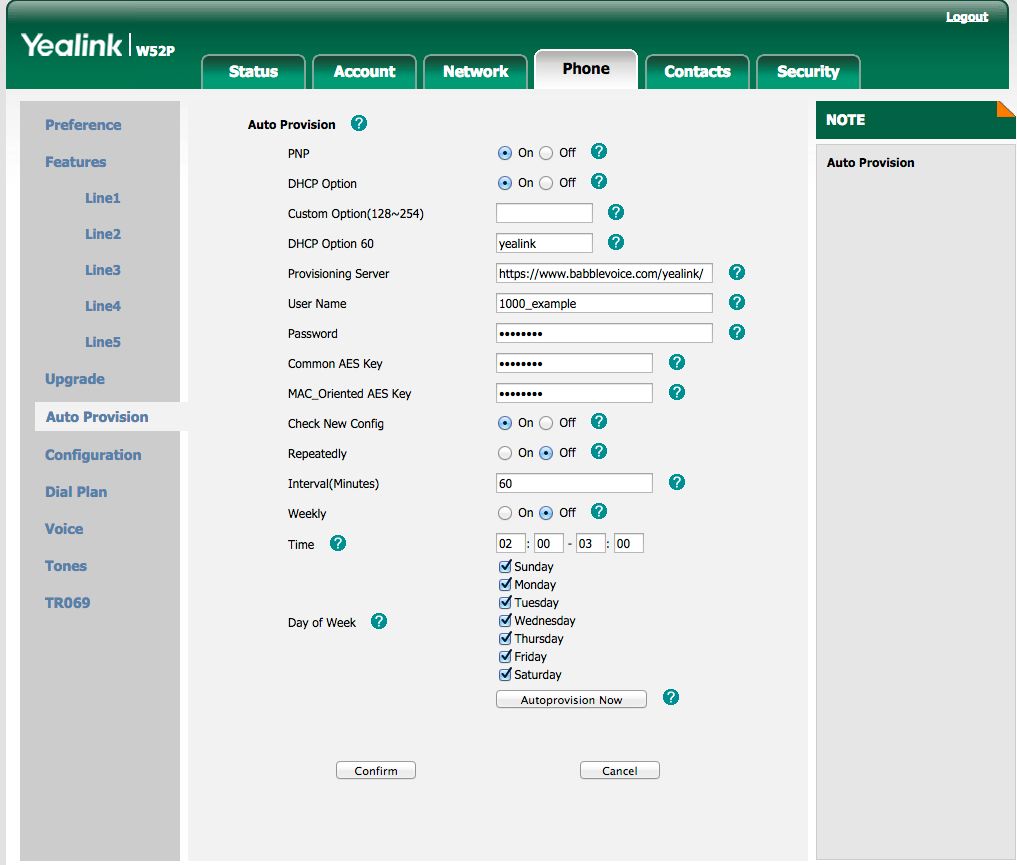
Note that the username field is in the format extension_domain which is different to the other Yealink models.
Firmware
We have found that on a certain W52P firmware the phone will not auto-provision, very strangely they seem to send no credentials when they try to auto-provision. The firmware in question is 25.73.0.27.
If you are running this firmware we recommend that you downgrade to 25.73.0.20 which is our tried and tested firmware.
Trusted Certificates
With the W52P's, T46G's and T41P's we have found that straight out of the box, they have disabled access to URL's without trusted certificates, for auto-provisioning this will need to be disabled. Which can be done by doing the following
Navigate to the security tab along the top then select Trusted Certificates on the left hand side. now you should see a screen similar to the one below:

Upgrading Firmware
Step 1
From the web-GUI select the upgrade tab:
Step 2
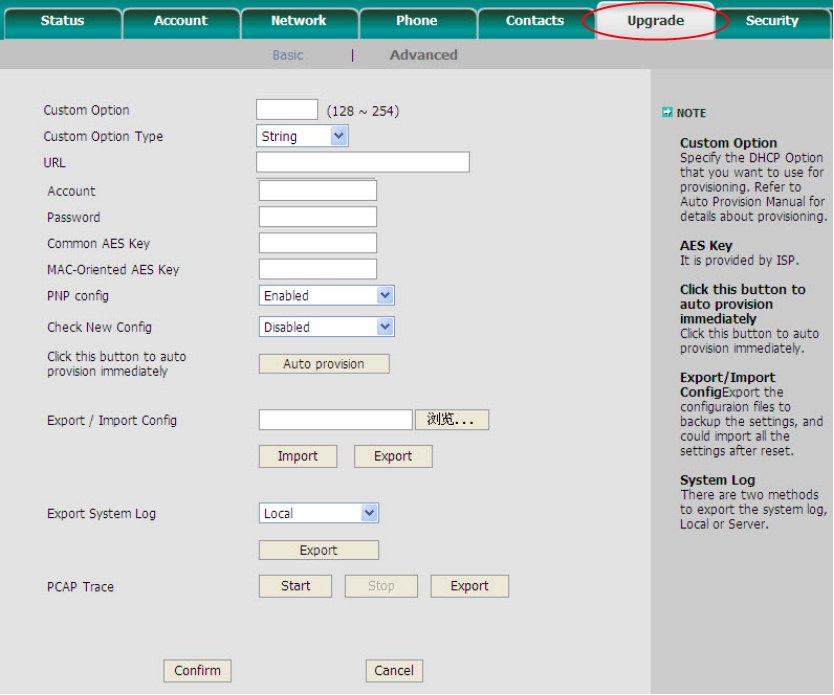
Next you will have to select the advanced option below the tabs:
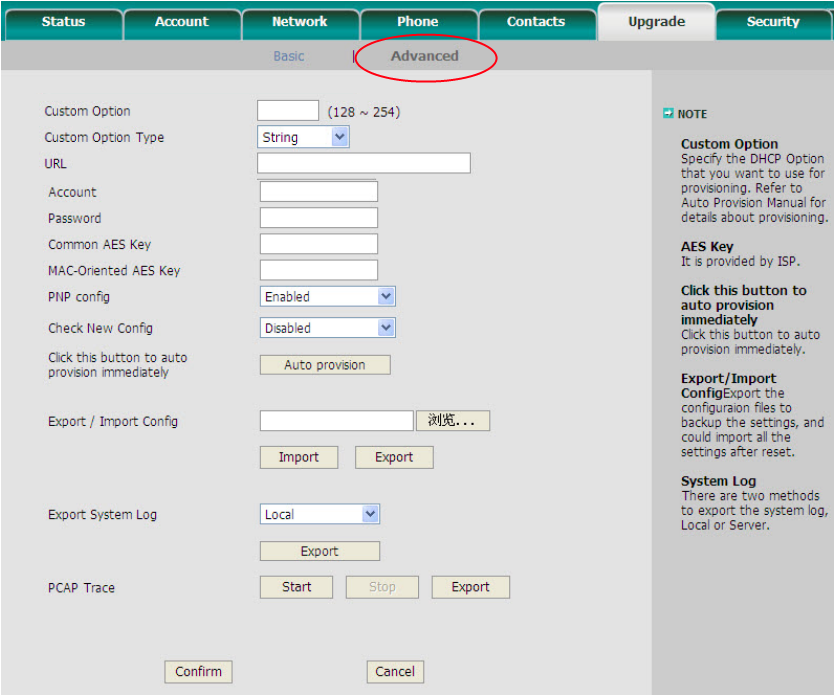
Step 3
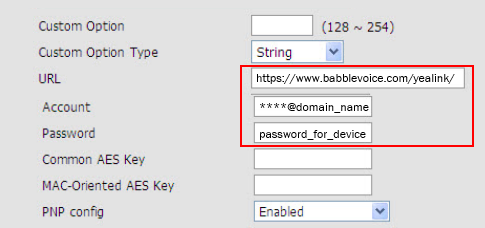
Here you will presented with a list of settings, there are only three required for auto-provisioning, URL, Account and Password
URL
The URL refers to a URL pointing towards our auto-provisioning module, This is the same for everyone (make sure you use https rather than http) - https://www.babblevoice.com/yealink/
Account
The account is the details for your babblevoice device, here you enter the extension number for the device then the @ symbol followed by the name of the domain, not including '.babblevoice.com' - 1000@exampledomain
Password
The password is for the password that can be configured through the babblevoice dashboard, to configure this go to your dashboard, select the device in the devices section, click edit device and from here you should see an input for secret, the text in here is what you put as your password for provisioning.
Now, you should see something like this:
Step 4
Next, hit the Yealinkconfirm.png button at the bottom of the page, this will save the changes we have made. Then use the Auto provision button which will immediately start the configuration process. which means the phone should start pulling the config files from babblevoice. The screen on the phone should read: 'Update Config Please Wait'.

Once this process is complete the phone should be fully configured for babblevoice and calls should be able to be made in and out. The provisioning also has some handy little features like pulling your contacts from babblevoice, this includes all devices on your domain along with the device phonebook in babblevoice.
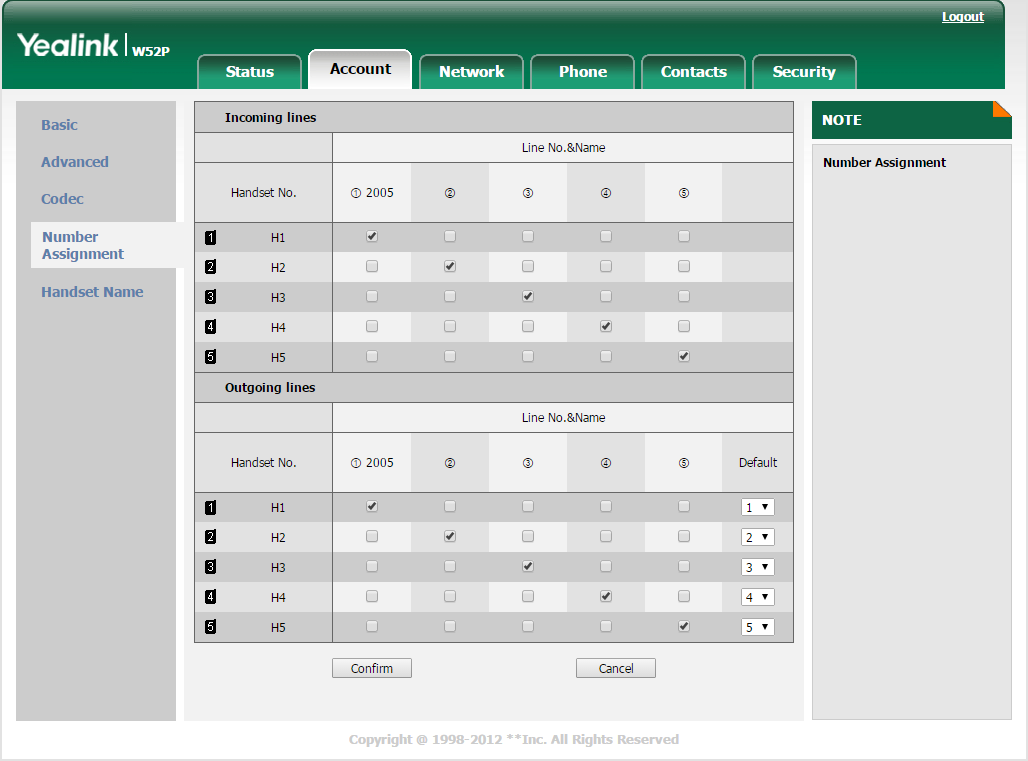
Handset assignment
If the handset you're trying to use with your base station isn't the default one, it might not get configured for the right account on the base station. If this is the case, you have to assign the handset with the correct account via the webGUI. To access the WebGUI, see our 'Accessing the WebGUI' above. After entering the Username and Password, click the 'Account' tab, followed by 'Number Assignment'. In this grid, make sure that the handset number is ticked in the correct Line Number and Name column. As you can see from the image below, H1 (handset 1) is linked to the extension 2005. This way you can link 5 handsets to the same base station, just by moving the ticks for the remaining handsets to the 2005 column. To check which handset is currently being used, using the webGUI, click the 'Status' tab, followed by 'Handset & VoIP' on the left-hand pane. Here you'll see the registered handsets and the names of the handsets also.
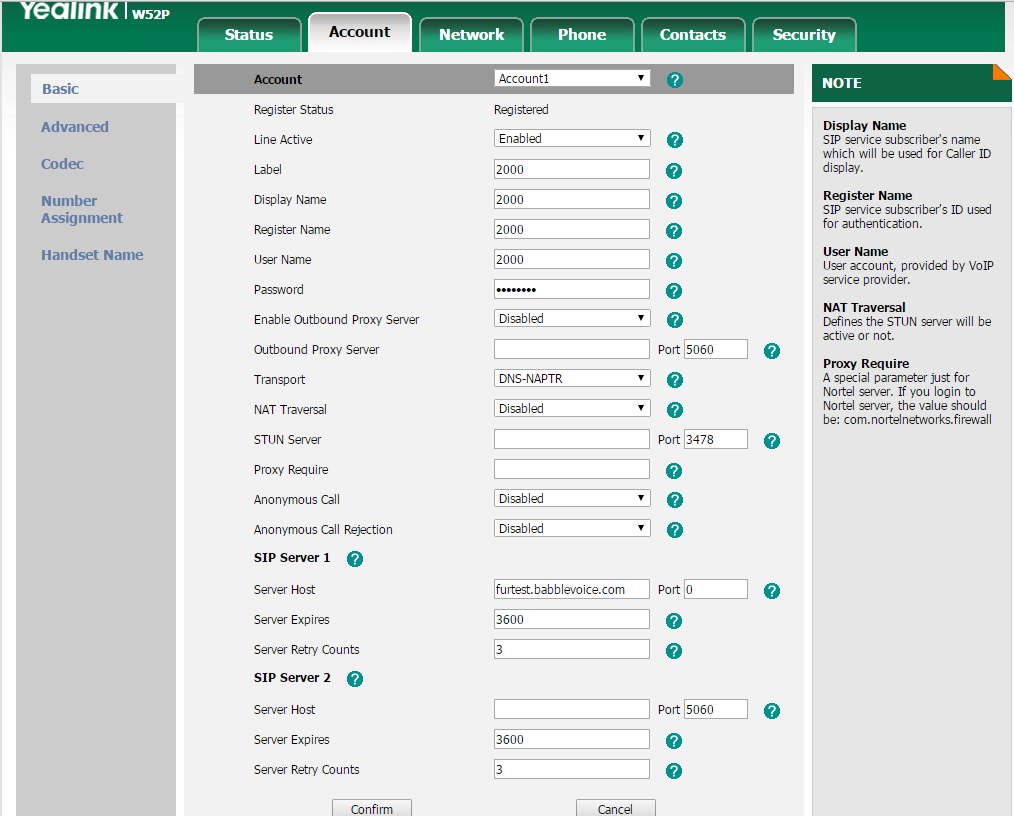
Account Registration
If you're having trouble with your accounts registering, and the Register Status on the Accounts tab in the WebGUI is reading as 'Registration Failed', please take a look at the image below and compare it with what you see for your account configuration.
Newer models
Yealin have recently updated their UI and some of the options have changed, the below are for the model W73P base station.
The Server host should be your domain - example.babblevoice.com
The username for this model is extension number @ domain - 1000@example


Tested in the range
Check out support phones page.